If you are a Windows user, you may know about hiding or locking a folder or file that contains confidential data.
But, if you have many such folders and files, then locking each folder is not good. A better option would be to transfer all files and folders that you want to hide from others, to some drives in your PC. Then, hide that entire drive so that it does not appear to anyone.
3 ways to Hide a Drive in Windows
There are different ways to hide a drive in Windows by using Disk Management, through Windows Registry, using Group Policy or by using Diskpart command in CMD.
We will see these approaches step-by-step so that you can apply the same to hide the drive in Windows.
Hide drive using Group Policy
- First, click on Start.
- Type run in search box and click on Run. A new window will open.
- Type gpedit.msc in Run box and hit enter.
 |
| gpedit.msc |
- Open user configuration as shown below image.
 |
| User Configuration |
- Then open administrative templates
 |
| Administrative Templates |
- Now open All settings
 |
| All Settings |
- Now find, Hide these specific drives in my computer, and Double click on it.
 |
| Hide these specific drives in my computer |
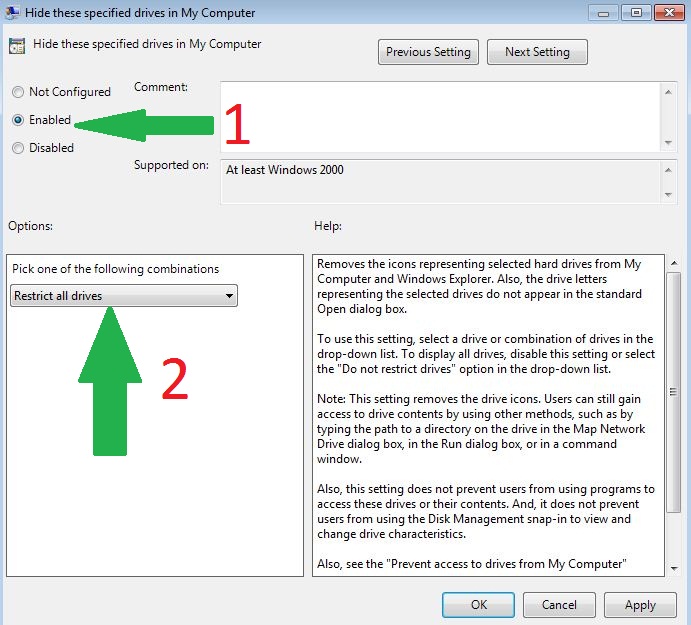
- Now click enabled, select any drive that you want to hide and click apply and ok.
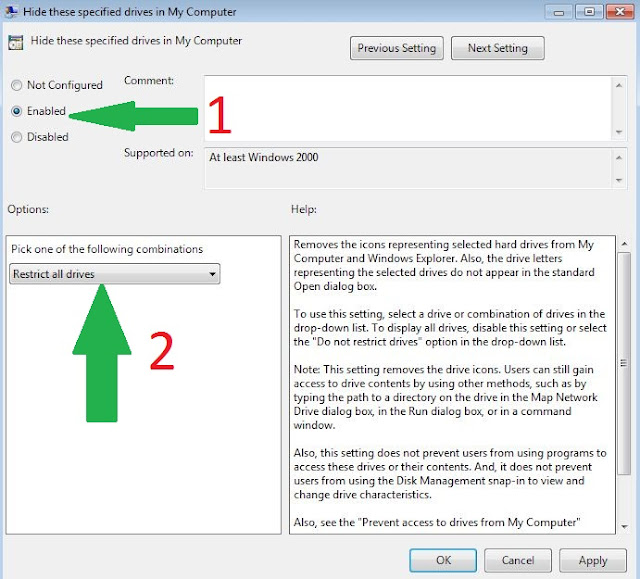 |
| Enable hide these specific drives in my computer and select drive |
- Then Restart your computer and your drive will not shown in my computer.
If you want access drive again, then follow all above steps and click on not configured or disabled.
Hide Drive using Disk Management
- Right-click on My Computer and then click Manage.
- In Computer Management Console open Storage by double clicking on it.
- Now, double-click on Disk Management Snap-in.
- Disk Management Console opens up, and you can see all drives of your PC.
- Choose the drive which you want to hide and right click on it. Choose ‘Change Letter and Paths’ and click on Remove button.
If it asks for confirmation, say ‘Yes’. Now, you cannot see the hidden drive in My Computer.
Hide Drive using Command prompt (CMD)
- Open command prompt, type Diskpart and hit Enter.(If, it say yes or no click on yes)
- Type List Volume and hit Enter.
 |
| List Volume |
- Now type select volume and the number of the Drive. As shown in above image, here the number of drive D is 2. So type select volume 2
- Finally, type Remove Letter D and hit Enter.
After that You will see a message – Diskpart successfully removed the drive letter or mount point.
To show the hidden drive, follow steps three steps Described above.
Now type
Assign Letter D and hit Enter. This will show the drive.


0 Comments
Post a Comment